

Central Processing Units (CPUs) are a miracle of modern science that allow human beings to offload staggeringly massive calculations onto computer systems. Many techs cast the CPU as the “brain” of the computer system or mobile device. This since the whole system is dependent on the processor.
It is truly amazing how far technology has come and how fast CPUs can run calculations. But if modern processors have become so advanced and lightning fast, why are some computer systems slow?
I’m sure everyone has wanted to bang their head against the wall as a slow desktop computer, laptop, or mobile device slows to a grinding halt, making even the simplest applications move slower than molasses.
There are a lot of reasons your computer is running slow, and they may not have to do with processor utilization.
So first, let’s take a moment to see how to check if your processor is overburdened.
How to Check CPU Utilization
The steps that are essential for checking CPU utilization are different on every platform. However, there’s a way to check real-time usage on every modern platform. I assume the majority of readers are using Windows. Thus we’ll start with Windows and only then move on to Mac and mobile systems.
The following outlines how to check real-time CPU utilization on Windows:
- Press the ctrl + alt + delete key sequence at the same time.
- Find the Task Manager option on the menu that appeared.
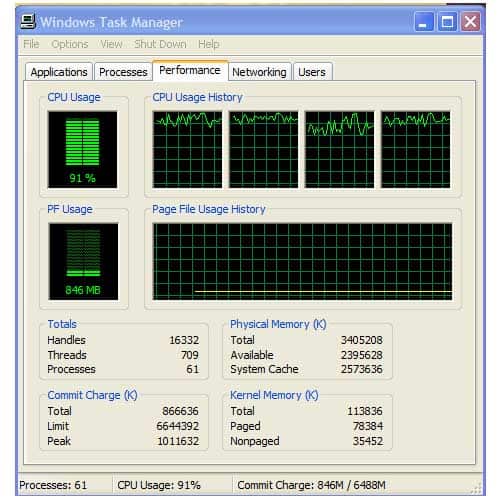
- Click on the “Performance” tab once the Task Manager pane opens.
From here, you’ll be able to see real-time data for not only the CPU but for memory and HDD usage as well.
The following steps to view current CPU utilization via the Activity Monitor on a Mac system:
- Open Finder
- Browse through to the Applications folder
- Browse through to the utility folder
- Click on Activity Monitor
- Select the CPU tab if not already selected
The CPU tab will show you what amount of CPU resources is devoted to each individual process. However, viewing current CPU activity on an Android device is a little different. Use the following steps to view the current CPU utilization on an Android device:
- Open the Play Store
- Search for a system monitor
- Download and install the app (they are usually free)
You may feel overwhelmed with the choice of free Android system monitors, though I would recommend CCleaner, CPU-Z, TinyCore, and System Monitor. If, after checking the real-time usage statistics, you notice that your CPU is hardly being utilized at all, there is likely a different reason that your computer or mobile device is running slowly.
For example, if you notice that one of the cores on your quad-core CPU had a usage spike that peaked at 50% utilization, adjusting the CPU settings may only produce modest results. However, if you have a slow or overtaxed processor, setting the CPU priority to prefer foreground apps can make a significantly noticeable difference.
Other Causes of a Slow Computer System
As I mentioned before, if you notice your CPU is far from over-utilized, you may want to try searching for other causes of poor system performance. So naturally, the very first thing you want to do is check your system monitor and CPU utilization during a time when your computer is running characteristically slowly. A few causes of slowly running apps and systems include the following:
- Insufficient resources (CPU, memory, HDD space, etc.)
- Old and outdated hardware
- A “dirty” operating system that needs to be cleaned with a tool like Ccleaner
- Too many apps trying to launch on startup
- Numerous invalid registry entries in a Windows environment
- Viruses or malware bogging down your system
- Slow Internet connections
- Too many apps running at once
There are, of course, about a million other reasons a single computer or device is running slower than a snail. If another cause is to blame, you may not see much improvement in system performance by adjusting the CPU settings to focus on foreground applications. Nevertheless, if you’re adamant that your CPU is to blame, use the following methods.
Affecting CPU Priority on Android
Unfortunately, there’s no direct equivalent on Android of the Windows setting that allows users to give priority to apps in the foreground. It seems that the Android operating system itself does already give processing priority to foreground apps over background apps, but there’s not really anything you can do to fine-tune processes without additional tools.
There is a tool called SetCPU, but it has several strings attached. First of all, it only works with rooted Android devices. And secondly, it isn’t nearly as general a setting as the Windows configuration. SetCPU will allow you to set CPU thresholds, minimum and maximum, regarding how much processing power is devoted to certain processes.
In fact, it can act like a governor, and make sure your CPU doesn’t expend too many cycles on a given process, which can be used to save battery life too.
You may also want to check out JuiceDefender too, though note that this tool wasn’t specifically designed for tinkering around with your CPU.
Instead, it has ways to set maximum use thresholds for processes by limiting CPU usage. These are the two best options for controlling CPU utilization in Android, so let’s move on the two Windows methods.
Windows 10 Method 1:
The first method of configuring the CPU priority in Windows uses the graphical interface (GUI), so it’s the most fitting for users who don’t have much technical knowledge of the operating system. In order to make the change, you simply need to make one small configuration via Control Panel.
In my opinion, the hardest part of the configuration is finding the right setting, which we buried underneath a myriad of configuration options and a maze of links.
Use the following guide to find the correct setting and give priority to foreground applications:
- Sign into your Windows 10 computer with an account that has administrative privileges.
- Open the Control panel in whatever way is easiest for you, such as browsing to it from the Start menu or by accessing it via the ctrl + alt + delete or the Windows key + “x” menus.
- Click on the System and Security heading, which is the very first item in the top left of the Control Panel screen, just under the text that says “Adjust your computer’s settings.”
- Next, simply click on the green System heading, which immediately follows the Windows Firewall options.
- On the following page, locate the “Advanced system settings” link on the left-hand side of the pane. Unless you have disabled it, UAC (User Account Control) will likely ask if you to confirm that you do indeed want to open the Advanced system settings tab.
- A new pane will pop up. Click on the “Advanced” tab, and then click on the first button “Settings” in the Performance section.
- The next box that pops up will have the label “Performance Options.” Click on the Advanced tab.
- The first box of the Advanced Tab has the label“Processor scheduling.” Make sure that the radio button next to “Programs” is selected, and make sure that this setting is not set to “Background services.”
- Click Apply.
- Click OK.

If you were unable to make changes as described in the preceding steps, I’m going to show you a second way to make the same changes. There’s been more than a few times when I’ve run into really weird Windows problems that prevent me from making system changes or prevent me from accessing the Control Panel.
If that’s the case, then I recommend using the second method, which follows next. However, I would recommend that you only follow the second method if you are somewhat proficient with the Windows operating system, and computers in general.
Windows 10 Method 2:
The next method requires editing the registry, which can be a little intimidating if you don’t know what you’re doing. Since you could mess up application settings and configurations for system-wide parameters should you edit the wrong value, please proceed with caution. In fact, I always recommend first backing up your registry just in case, so you have a great fall back point in your back pocket.
Use the following steps to change CPU priority via the registry:
- Open the Registry Editor. This can be done by either searching for Regedit.exe or running “regedit” from the search/command bar.
- Browse through the hives and keys to the following location: HKEY_LOCAL_MACHINE => System => CurrentControlSet => Control => Priority Control.
- Here you should find a registry setting labeled “Win32PrioritySeparation.”
- To give preference and priority to applications running in the foreground, simply change this value to “26”.
Both Windows configuration methods can be completed in under a minute. But now that the change has been made, how do you know it worked?
Answering the Question: Did It Work?
After making such a change, you’re probably antsy to do two things. Firstly, you probably want to test out your new configuration. Secondly, you probably want to be able to measure how much improvement there is in the speed of your computer.
Apart from using a stopwatch to time how long different operations take before and after the changes were implemented, there are really two good options for measuring performance.
First and foremost, you can check current CPU utilization as we did before the changes were implemented. Secondly, there are memory/CPU tests and benchmarking applications that can measure CPU performance. However, if you can’t notice a significant difference after making the changes, chances are there’s another root cause other than a slow CPU.
If that’s your case, then I’d revisit the section that describes what causes a slow computer and start troubleshooting.
Final Thoughts
Most people don’t have any idea how many background processes are hogging precious system resources and slowing down computers and mobile devices. The good news is that you can easily tell your processor to focus on the applications in the foreground by using this easy guide.